Thursday, October 31, 2013

Trick or Treat


Hi and Happy Halloween!

Welcome to today's post where I'm going to share what I'll be doing along with a little bit of history of the day... and of course some lovely handmade treats!


Although it isn't celebrated as keenly as it is in the US, Halloween originates from over here in the UK. The oldest stories reach back to the Celtic festival of Samhain (pronounced Sah-Ween) which marks the final harvest and the end of Summer. The Celts held any time of change or transition in high regard and believed that these times were magical and spirits could wander freely. Those that had died in the previous year could pass across to the otherworld and those already passed could travel back through to earth. Fires were lit in their honour and costumes were made from hollowed out animal heads and skins to represent the Gods of Nature.


Today, I'm going to be busy carving pumpkins with my kids, and they want angry birds... I think they're being a bit hopeful of my capabilities!

The tradition of carving pumpkins or Jack O' lanterns comes from Ireland where there lived a man known as Stingy Jack. He was well known for being mean and playing tricks on those around him and also for being a terrible drunk. One evening in a bar, he met the devil.


Not being easily intimidated, he asked him to join him in a drink. But being stingy, he didn't want to pay for them, so he convinced the devil to turn in to a sixpence to pay the bill in return for his soul. But rather than settle up, Stingy Jack decided to keep the coin and put it in his purse where he kept a cross. The devil was trapped and couldn't return to his original form. Jack agreed to let the devil go free if he promised not to bother him for a year. A year later, Jack again met the devil, this time while walking home. He convinced the devil to climb up in to a tree to pick him an apple. While he was up there, Jack carved crosses in the tree preventing the devil from climbing down again. This time, he agreed to free the devil if he promised to leave him alone for 10 years.


Before his 10 years were up, Stingy Jack died and went up to heaven. He was turned away at the gates due to his mean ways on Earth, so he travelled down to hell. The devil refused him entry as he had promised not to take his soul for 10 years and wasn't happy about being tricked, so Stingy Jack had no place to rest. As he left he asked what he should do... the devil threw him a burning ember, which he put inside a hollow turnip to light his way as he roamed for eternity looking for a resting place.


So with the pumpkins carved, it will be time to dress up, this year we're going with skeletons. Traditionally costumes have been worn to hide from the faeries or spirits alleged to run free on the night of Halloween. Disguised as beggars, they visit houses asking for treats and handouts. They will reward those who give food, but those who refuse will be tricked. Other stories say that pumpkins are left outside houses to guide the souls of those lost through the year home, and the scary faces are carved to scare away evil spirits.

Ours will be going in the garden while we go out looking for ghosts, and bats, and witches on broomsticks.


Witches for modern Halloween are usually portrayed haggard old ladies with warts and green faces, cackling around a cauldron. But the first witches were much kinder people.

The word witch, derives from 'Wicca' meaning 'Wise one'. These women were originally known as wise as they were healers. They practised early forms of medicine, making natural remedies to assist with pain and other ailments and were well respected in their communities.


With the spread of Christianity through Europe, practising medicine was frowned upon and considered to be practising against God's will, so witches were cast as evil, horrible old hags doing the work of the devil, and mass hysteria ensued. Accusations flew and people were accused of witchcraft for things as simple as having a birthmark or mole, considered to be marks of the devil. Those leading the witch hunts would offer the accused salvation in return for their confession and naming of the other witches in their coven. Faced with the choice of a nasty painful death, or being saved by naming a few others, the accused usually put forth the names in order to save themselves. This lead to hundreds of people being falsely accused and many put to death. This spread across continents with the migration of the Irish and led to events such as the Salem witch trials. 


And finally, we can't have a Halloween post without a cat! Now a symbol of good luck, the black cat was once feared as a figure of darkness. It was said that witches could transfer between their human form and that of their familiar to travel incognito, that the devil often appeared as a black cat when associating with witches, and even that they were gifts given by the devil. Cats were accused along with the witches of practising the dark arts and unfortunately many suffered the same fate as their owners. Thankfully we're a little more open minded about our pets now!

Well it's time for me to go and carve some pumpkins...


I hope you enjoyed reading, and whatever you're doing and whatever you believe, I hope you have a very Happy Halloween!


Caroline 

Wednesday, October 30, 2013

October Component of the Month Reveal

This year is going by at lightening speed, I remember only a few days ago being amazed it was October already and now October is almost over! Crazy!!!

I am very excited to see what everybody has created with my Copper Ammonite pieces!!!


 They are basically Bracelet Focals but I wouldn't be at all surprised to see a necklace thrown in the mix.
We've got an amazing group of talented artisans playing along this month, please take a look and I know they would love to hear what you think of their creations!

Guests
Kym Hunter Designs
MiShel Designs

AJE Team Members
Jennifer Cameron Glass Addictions
Lesley Watt Gossiping Goddess
Kristen Stevens My Bead Journey
Caroline Dewison Blueberri Beads
Jenny Davies-Reazor 
Melissa Meman 
Rebekah Payne Tree Wing Studio
Francesca Watson
Sue Kenney SueBeads
Kristi Bowman Design

And the WINNERS for
 NOVEMBER Challenge are...

Alice of Alice Dreaming
Lindsay Durflinger

Kristi

Tuesday, October 29, 2013

Inspired by Ceramics; the Exploration of "Organically Grown" Metal

I have admired Keirsten Giles' work for a long time, her sense of wonder, and the desire to explore and play. So I was super excited when she agreed to occasionally guest blog for you, our wonderful AJE readers. Enjoy! -Jen
-------------------------------------------


Every few months I get kind of bored with the jewelry I’m doing and so I change it up a little. I often will be inspired by another artist’s work that has a slightly different vibe than mine, and I’ll start heading a little in that direction to see what happens. 

Lately I’ve been wowed by really archeological and natural-looking pieces with a wild, primitive feeling, and dark, moody metals. I started collecting beads and focals with more of this primitive, rustic feel, preparing myself to take a little side-turn when inspiration struck. Robyn and Rey of Ragged Robyn and Grey Bird Studio, respectively, have really knocked my socks off with both their imagination and their uncanny ability to create objects that feel authentically ancient or natural. I picked up a couple little things from their shops:

Porcelain pods from Grey Bird Studio (mine!)

Tapered pod relics by Ragged Robyn (mine!)

Absolutely fabulous—it isn’t easy to mimic nature, or true agedness, like this. My hat is off to these hypertalented women! I could sit for hours just looking through their Etsy shops.

I don’t work in ceramics but rather metal, so I have been mentally exploring ways to make a piece of metal seem organically grown, or naturally aged/distressed. Lately I have been looking at pictures of ancient pottery shards on the Internet, and thought, “Why not try to fake up my own broken pottery shards, but with metal? It’ll be fun!!” And off I went.

I thought I’d make different sizes I could use for pendants, bracelet clasps, necklace connectors, etc. I had too much trouble trying to draw faux-broken edges, so I just sketched the basic shape and then let my saw wander where it might.

My freshly cut metal “shards”

It was way harder than I expected to create random edges! But I will say I overcame my loathing of the saw—it was actually kind of relaxing. Especially once I was using the right gauge saw for my metal. And nothing beats a fresh blade and some beeswax!

My plan was to etch them, so after filing and sanding the edges, I applied my designs using digital files printed onto PressnPeel sheets, using a household iron.

Shards ready to etch


Freshly etched shards

After etching them, I tube riveted most of the holes (I have an aversion to plain holes in metal components, and I also feel a little more secure using them with linen cording if there’s a tube rivet—fewer sharp edges to cut through the cording during the normal wear and tear.)


Tube-riveted shards

Then I blackened them to have a nice dark base to apply my patina over:

Shards nice and black from the LOS bath


I thought for this first batch, I would try to suggest the idea of old glazed pottery, so I used dye oxide patinas on them rather than leaving them as bare metal. I wasn’t totally thrilled with the results—I have a hard time getting a pattern to stand out using these patinas—so I applied a whisper of gilder’s paste over the top of the finished patinas to highlight the patterns a bit:

Finished shards ready for sealant

I couldn’t help leaving a couple of them bare metal (I love the color of copper! In retrospect, I think I would have preferred to leave them all bare copper, just adding other small patinaed elements to them.)

Bare copper necklace connectors


I just got a pile of really rustic recycled glass beads from Happy Mango Beads, which I think will work nicely with my “shards,” and I still have my hoard of Petra Carpreau treasures, plus my new earth relics from Rey and Robyn—I’m all set, so stay tuned. I should have some new jewelry to show in about six months, haha!

Keirsten’s Etsy shop: www.etsy.com/shop/lunedesigns
Keirsten’s Flickr photostream: http://www.flickr.com/photos/lunestudio/

Monday, October 28, 2013

Halloween/Day of the Dead Jewelry Blog Hop Reveal

Halloween is one of my favorite holidays.  To celebrate this year, I hosted a Halloween/Day of the Dead Jewelry blog hop.  The rules were simple; create Halloween or Day of the Dead themed jewelry and make sure each incorporates an art bead/component.  Over 40 people joined in the fun!

If you would like to learn more about the Day of the Dead, then check out Linda's post here.  Last year, Linda and her husband were in Oaxaca, Mexico during the celebration.

To see all the blog hop creations, come join me over at Suburban Girl Studio for the full list of participating blogs.

Have a spooky day!

Diana P.
Suburban Girl Studio LLC

Sunday, October 27, 2013

Earring Challenge Reveal 20 - Weeks 41 & 42/52


Well here we are again with another earring reveal and on the home stretch of this epic year long challenge. Hope you've been enjoying doing this with us and will be here to the end...


In keeping with the season the first pair I'm featuring this week are from Monique of 'A Half Baked Notion". Lovely pumpkin coloured lampwork beads play beautifully on the dark chain and the flash of purple makes them really eye catching.


Next up another pair with a Halloween theme from Sarah Jo at SJDesigns Jewelry with lovely subtle pumpkin images that Sarah has set with Resin in brass bezels...perfect for the whole autumn too.


This final pair by Kiersten Giles also pick up the Autumnal tones but rather than Halloween, these remind me of an event we celebrate here in the UK n early November - Guy Fawkes Night, especially the smoky dying embers of the bonfires...


So that's it for this reveal and just 10 more pairs of earrings to make to see the challenge through...if your on track for all 52 pairs congratulations!

The next reveal will be on the 10th of November so do come back and join us then and don't forget to link your blog posts using the linky tool below...


Lesley
The Gossiping Goddess

Saturday, October 26, 2013

Two Weeks in Review - In Tree Wings Studio

Alrighty… it's time to report in:

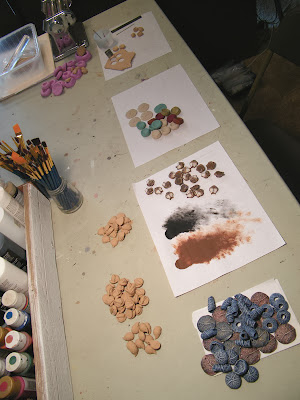
Here's my work table after two weeks of managed studio time. Yes, I did tidy it up a bit — things were more than a little messy!

Did I meet my goals? Not quite. But I made very good progress. For my shop staples, here are my totals:

I cast, shaped, and painted 24 Queen Anne's Lace beads and pendants, and painted 22 previously cast Queen Anne's Lace beads.

I sculpted 52 sleepy critters.

And, I started painting 22 sleepy owls (sculpted a few weeks back).


I didn't do as well with new bead ideas. But that's okay — sometimes new ideas just don't come easily. I did make some of my current beads in new colors though: 5 Queen Anne's Lace pendants, and 14 (soon to be) painted speckle beads — I'll be testing new paint mixtures on these.


And the sleepy fawns are getting ready to become reindeer for Christmas, 2 new sleepy puppy dog designs are in progress, and 1 pine cone became a mold for new beads.


Scheduled for tomorrow, I have new crackle beads — they are going to go with a certain pretty copper component from Kristi


So all in all, things did not go as perfectly as I'd hoped, but they did go nearly as well as I expected. I'm about 2/3rds of the way to where I want to be and this was only the first two weeks. But, I'm encouraged and very excited about what I can accomplish in another two weeks! There will be some more schedule tweaking and possibly an adjustment of my completed bead goals.


And… I almost forgot to mention, my sisters and I had fun trying out a new brownie recipe on my "day off"! Yum!


Yes, it was a very good beady two weeks! How did you all do? Did you find/make more time for creativity? Did you create anything new? And most of all did you have fun? Do share!


Friday, October 25, 2013

Freeform Friday - Victorian mourning jewelry

I love Halloween. I love the dark and mysterious, cauldrons, witches, the wheel of the year turning to winter. We have discussed the Day if the Dead here recently and I decided to take topics a wee bit darker for the next two weeks - leading up to Halloween and All Soul's Day/All Saint's Day. 

The topic was inspired by a conversation I was having over at Art-Share.org, a podcast of which I am part. We were embracing the dark, maybe morbid topics for the month of October - things like momento mori, and ... hair jewelry. So I was inspired to research both Victorian hair jewelry and mourning jewelry styles. 

Mourning jewelry

Mourning jewelry provides the wearer with a physical object by which to memorialize a lost loved one; providing comfort and acting as a momento mori.  Some of the earliest examples date back to the 15th/16th century. Items found in Europe from this era include black and white enamel pieces, often skulls, set into rings and brooches. 

In the 17th and 18th centuries it became a mark of status to wear mourning jewelry for deceased loved ones. The height of the style came in the Victorian era. Queen Victoria's consort Prince Albert died in 1861; she dressed in black for the remainder of her days. In the US at this time, the Civil War helped increase the popularity of mourning jewelry - as to be expected...


The five daughters of Prince Albert wore black dresses and posed for a portrait with his statue following his death in 1861.

Victorian mourning attire was strictly regimented: 


  • "Full mourning"  - 1 year long. Full black, weeping veil. No adornment. 
  • The transitional period allowed for minor adornment including mourning jewelry. This transitional stage was 9 months. 
  • "Half mourning" - 3-6 months. Any jewelry allow. Colors could include grey, violet, mauve, deep reds... 


Types of mourning jewelry

coffin ring from 1715  - crystal coffin shape over skull and hair work


Rings and brooches were the most common forms of mourning jewelry, usually inscribed with the name, date of death and age of the deceased. Popular motifs included funeral urns and weeping women in a Neo-Classical style. Hair was often used, under glass, intricately woven... ( More on that next week)
Images from HistoricNewEngland.org
Brooches: 
Enamel brooch, jet and hair brooch, carved jet brooch. 

Jet

Jet is a mineraloid, derived from fossilized wood. It is ultra black, smooth and lightweight.  It has been used since Ancient Greece circa 200 BCE. The Venerable Bede says this about British jet: "Britain has much excellent jet... black and sparkling, glittering at the fire, and when hearted drives serpents away..." Superstition had it that jet was shiny enough to avert the evil eye.

The town of Whitby is known for its jet, although jet occurs in other regions. Whitby jet is from the Jurassic era - app. 182 million years old. Whitby was a popular Victorian seaside destination, and the Whitby jet trade started as a souvenir industry. After Prince Albert's death, Queen Victoria's mourning regimen helped to increase jet's popularity. The rise of jet's popularity saw shops carving and selling jet jewelry in town go from 50 workshops in 1850 - to 200 shops in 1873! It is currently illegal to mine jet in Whitby, as it has been over mined and the shale based cliffs are rather unstable. Contemporary jet carvers are working with pieces washed up on shore that have naturally sloughed off the jet lines in the cliffs.


Stay tuned next week for more of the morbidly fascinating, the dark Gothic, the hair jewelry... 

Jenny


www.jdaviesreazor.com


References: 


Thursday, October 24, 2013

Seeds of Inspiration


http://www.angielewin.co.uk
I am currently at the mercy of two major infatuations which are gradually becoming intertwined - an intense and deepening devotion to all things clay and a love of botanical life in its seed dispersal phase. The image above is by one of my favourite artists, engraver and illustrator Angie Lewin who uses plants and their habitats as inspiration for her designs.

In my last post I unveiled my first pieces of ceramic work and as I've continued working with clay I've come to realise that it can be an incredibly relaxing and therapeutic medium to work in particularly when used sculpturally. In theory metal clay can be used this way but it doesn't have the plasticity of ceramic clay and dries out very quickly...not to mention the fact that it's expensive and the finished pieces would be very heavy. Rather than just transfer my bronze clay work straight into ceramic I wanted to try and develop some new ideas and this extra time is enabling me to do just that.

So were does the botanical element come in..? Well since I have no previous experience or expertise in sculpting or modelling I was looking for something fairly simple to start with and turned to one of my favourite forms - the seed pods of the Physalis or Chinese lantern...

Physalis
These have a beautiful, slightly ethereal equality so I thought I'd try and recreate one as a pendant. Mine morphed slightly into a Physalis/pumpkin hybrid but I like it never-the-less and just loved the process involved in the making.


Well this one sold and I had custom order so earlier this week I set about making another. This one hasn't been fired yet and as you can see it's developed a bit of a sexier shape...


Putting this aside to dry I started to think about how I could develop this further and began playing with a piece of clay - elongating the form and then adding some decoration...


I really like it - It has a lovely tactile feel and I'm really excited to see how It will be transformed with different glazes.


Now my head is bursting with ideas for a series of botanically inspired pieces so off I went to do a little online research and gather up some suitable specimens. And heavens, there are just so many beautiful things out there to choose from - mother nature really is the best when it comes to designing for form and function isn't she....

Sarracenia
Does this next one remind you of anything...?

Abrus
Lotus
Milkweed
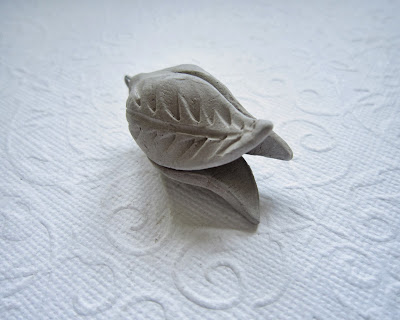
I had a go at one more yesterday - a  bit more delicate in design and probably better suited to a stronger clay but it's all good practice...


So I hope you like this little insight into my inspiration - somehow I think there will be a few of these designs germinating pretty quickly so I hope you like them! If you know of any plants with interesting seed heads or pods do let me know.

Lesley